RECENT UPDATES

The instructions below are for Windows XP to Windows 10. The instructions should be similar for each. Please follow the steps below to connect your computer to your projector.
1. Using a standard HDMI cable, connect each end of the cable to each the BP1/HP1 and your computer.
2. Once connected, turn on the BP1/HP1. On the menu screen, select the "Inputs" option.
3. Then, select the HDMI option.
4. On your computer, it may have already automatically connected through the HDMI, but you can adjust the setting to fit your needs. If you have Windows 7, press and hold down the Windows Key (the key with a windows flag) and then while holding down that key, press "P". You can then set it the following ways:
- Computer Only - Disconnect your projecting screen
- Duplicate - Mirror your computer screen with what's projecting
- Extend - Make the projection an extension of your computer screen
- Projector Only - Only operate your computer on the projected screen and nothing on your computer screen

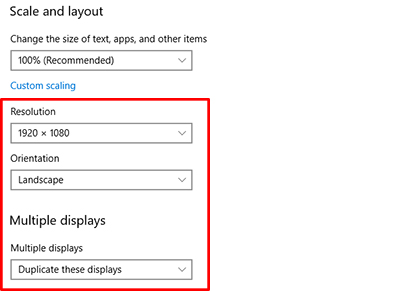
5. For Windows 10, please make sure the Multiple displays has the "Duplicate these displays" option selected and the Resolution is 1920 x 1080 or below as pictured in the red box.

6. Your BP1/HP1 is now a second screen to your computer!


